Valve leakage classes and ratings in API 598 show how much fluid can leak past a closed valve. Engineers use these rules to pick the right valve for safe use. A check valve must follow strict leakage rules to stop backflow. Each valve type, like butterfly valve, ball valve, or control valve, has its own leakage needs. A rating lets people compare how much valves leak and check if they follow the rules. Knowing how much a valve can leak keeps equipment safe and the system working well.
API 598 Overview
Scope
API 598 tells companies how to check and test industrial valves. This rule explains how to test if valves are strong and do not leak before leaving the factory. API 598 is for gate, globe, and check valves. It also covers valves with different seat materials, like soft seats, plastic seats, or metal seats. The main goal is to make sure each valve does not leak too much and works safely.
Note: API 598 helps people make sure valves do not leak more than allowed when used in a system. This lowers the chance of equipment breaking and keeps things safer.
Valve Types
API 598 talks about many common valves used in pipes and systems. These are:
- Gate valves, which open by moving a gate up.
- Globe valves, which use a disk to control flow.
- Check valves, which let flow go one way and stop it from going back.
Each valve type has its own tests in API 598. The rule also covers valves with different seat materials. For example, a metal seat valve may have different leak rules than a soft seat valve. API 598 makes sure all these valves follow the same basic rules for leaks and strength.
Inspection and Testing
API 598 explains how to check and test valves before sending them to buyers. The rule says to do tests like shell tests, seat leak tests, and back seat tests. These tests look for leaks and make sure the valve body can take pressure. Inspectors use water or air for these tests, depending on what is needed.
The rule also talks about other important rules, like ASME B16.34, FCI 70-2, ISO 5208, and MSS SP-61. These help people see how API 598 fits with other valve testing rules.
Tip: Always check which API 598 version you need for your job. Rules can change, and using the newest one helps you follow the rules.
Valve Leakage Classes
Valve leakage classes show how much fluid can get past a closed valve. API 598 gives clear rules for each class. These rules help people pick the right valve for their system. The leakage class chart shows limits for each class. It helps compare valves for different jobs.
Class I
Class I is the simplest valve leakage class. API 598 does not ask for a leakage test for this class. Utility-grade valves are often Class I. These valves go in systems where leaks do not cause trouble. People use Class I valves where safety and tight shut-off are not needed. The leakage class chart says Class I has no test. So, it is not good for important process controls.
Note: Class I valves do not promise tight shut-off. They work in simple systems where leaks are not a problem.
Class II
Class II valves let out a small amount of fluid. API 598 sets a low leak limit for this class. Metal-to-metal seat valves often meet Class II rules. These valves work well in HVAC and water systems. Engineers pick Class II when they want better control than Class I but do not need tight shut-off. The leakage class chart shows Class II is good for low-pressure and non-critical jobs.
Class II valves allow some leaks. The leak rate is higher than Class III or Class IV. People use these valves when a little leak is okay and the system does not need strict isolation.
Class III
Class III valves control leaks better than Class II. API 598 sets stricter limits for this class. Non-critical process controls and steam isolation often use Class III valves. The leakage class chart lists Class III for systems that need more control but do not need tight shut-off.
Class III valves leak less than Class II. Engineers choose Class III for better performance but not the highest isolation. These valves work in places where some leaks do not hurt the system.
| Valve Leakage Class | Typical Applications |
|---|---|
| Class I | Utility-grade valves (no leakage test needed) |
| Class II | HVAC and water systems (low leaks, metal-to-metal seats) |
| Class III | Non-critical process controls, steam isolation |
Tip: Always look at the leakage class chart before picking a valve. The chart helps match valve leakage classes to what the system needs.
Class IV
Class IV is a very common valve leakage class in factories. API 598 says Class IV is for metal-seated valves that need some leak control. Engineers pick Class IV for systems that need good isolation but not perfect shut-off. The allowed leak for Class IV is very small, about 0.01% of the valve’s rated flow. This class works well in chemical plants, steam lines, and general flow control.
The leakage class chart shows Class IV is for metal-seated valves where a little leak is okay. Operators use Class IV valves when they want a balance between price and how well it works. Class IV does not promise bubble-tight shut-off, but it protects most process systems enough. Many control and isolation valves in refineries and power plants are Class IV.
Note: Class IV valves are a good middle choice for leak control and strength. They work in systems that do not need zero leaks but still need to work well.
Class V
Class V is a higher valve leakage class. API 598 says Class V is for valves that face tough jobs and big pressure drops. The allowed leak for Class V is very tiny, just a few drops each minute, depending on valve size and pressure. Class V valves have metal-to-metal seats and get tested a lot to make sure they leak very little.
Engineers use Class V for important jobs like high-pressure steam, dangerous fluids, and emergency shut-off. The leakage class chart puts Class V above Class IV, showing it has stricter limits and is for harder jobs. Class V valves almost shut off all leaks, so they are great for safety systems and places where even small leaks are bad.
Operators pick Class V when they need the best leak control and trust. These valves cost more than lower classes but work better in tough places.
| Class | Allowable Leakage | Typical Use | Seat Type |
|---|---|---|---|
| IV | 0.01% of rated capacity | Process isolation, flow control | Metal-to-metal |
| V | Few drops/minute | High-pressure, hazardous service | Metal-to-metal |
Class VI
Class VI is the top valve leakage class. API 598 says Class VI is for soft-seated valves that must not leak at all. The allowed leak for Class VI is almost zero, measured in tiny drops per minute. Class VI valves use soft materials like Teflon or elastomer seats to stop leaks.
Engineers choose Class VI when any leak is not okay. These valves are used in gas lines, medicine making, and food plants. The leakage class chart shows Class VI is for soft-seated valves that need the best shut-off. Operators trust Class VI valves to stop leaks, keep things clean, and protect safety.
Tip: Always check the leakage class chart before picking a valve for tight shut-off. Class VI valves promise bubble-tight shut-off and keep important systems safe from leaks.
Class VI valves cost more because of their special seat design and extra testing. They give the best leak control and keep systems safe in important places.
Comparison

Engineers look at each class to pick the best valve. Each class has its own rule for how much leakage is okay. The table below shows how the classes are different.
| Class | Allowable Leakage | Typical Seat Type | Typical Application | Tight Shut-Off |
|---|---|---|---|---|
| Class I | No test required | Any | Utility, non-critical | No |
| Class II | Small, limited leak | Metal-to-metal | HVAC, water, low-pressure | No |
| Class III | Less than Class II | Metal-to-metal | Non-critical process, steam | No |
| Class IV | 0.01% of rated flow | Metal-to-metal | Process isolation, flow control | No |
| Class V | Few drops per minute | Metal-to-metal | High-pressure, hazardous service | No |
| Class VI | Tiny drops, near zero | Soft-seated | Gas, food, pharma, clean service | Yes |
Note: Only Class VI valves give tight shut-off. These valves have soft seats that stop almost all leaks. Classes I to V use metal seats and let some leaks happen.
Engineers use these classes to match what a system needs. Class I is good for simple jobs where leaks are not a big deal. Class II and Class III work for systems that need some leak control but not tight shut-off. Class IV and Class V are for process and safety systems that need better leak control. Class VI is special for jobs that must have tight shut-off, like gas or clean fluid lines.
Soft-seated valves are usually Class VI. Metal-seated valves fit Classes I to V. The choice depends on how much leak is okay and if tight shut-off is needed.
Tip: Always check the class before picking a valve. The right class keeps the system safe and working well.
Allowable Leakage
Liquid Test
API 598 has strict rules for how much liquid can leak. Inspectors use water or another liquid to test if a valve leaks when closed. The standard says how much fluid can go through the closed valve seat in a set time. For most valves up to 2 inches, no drops are allowed each minute. This means you should not see any leaks during the test. Bigger valves also must have zero drops per minute in the liquid test.
Inspectors look closely to see if there are leaks. They watch for drops or wet spots at the seat or body. If they see even one drop, the valve fails the test. This way, only valves with no leaks leave the factory.
| Valve Size (DN mm / NPS inch) | Liquid Test Allowable Leakage |
|---|---|
| ≤ 50 / ≤ 2 | 0 drops/min (no visible leakage) |
| 65 / 2-1/2 | 0 drops/min |
| 80 / 3 | 0 drops/min |
| 100 / 4 | 0 drops/min |
| 125 / 5 | 0 drops/min |
| 150 / 6 | 0 drops/min |
| 200 / 8 | 0 drops/min |
Note: Zero drops per minute means the valve cannot show any leaks during the test.
Gas Test
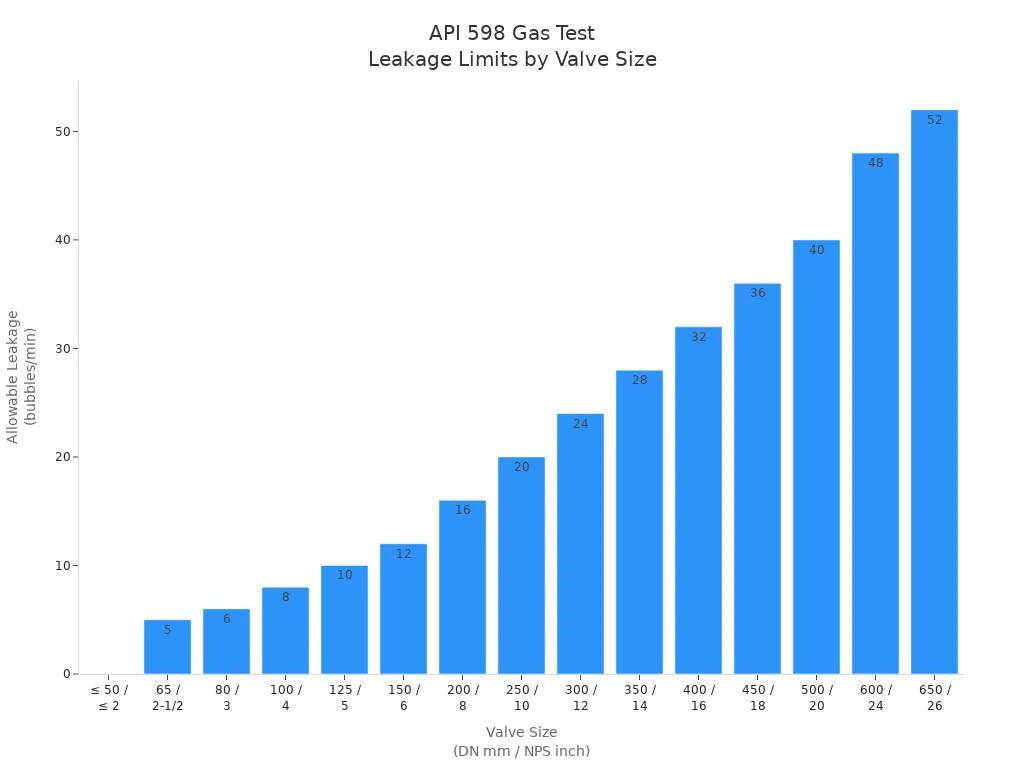
The gas test checks for leaks using air or another gas. API 598 lets a small number of bubbles out, depending on valve size. Inspectors use a tube in water to count bubbles from the valve. For valves up to 2 inches, less than one bubble is allowed during the test. Bigger valves can have more bubbles as they get larger.
The table below shows the gas test limits for different valve sizes:
| Valve Size (DN mm / NPS inch) | Gas Test Allowable Leakage |
|---|---|
| ≤ 50 / ≤ 2 | 0 bubbles/min (less than 1 bubble per test) |
| 65 / 2-1/2 | 5 bubbles/min |
| 80 / 3 | 6 bubbles/min |
| 100 / 4 | 8 bubbles/min |
| 150 / 6 | 12 bubbles/min |
| 300 / 12 | 24 bubbles/min |
| 600 / 24 | 48 bubbles/min |
Tip: The gas test uses bubbles to measure leaks. The inspector counts bubbles to check if the valve passes.
Measurement Units
API 598 uses different units to show how much can leak. For the liquid test, inspectors count drops each minute. For the gas test, they count bubbles each minute. Sometimes, standards use milliliters or cubic centimeters to measure leaks. One milliliter is the same as 16 drops in the liquid test. This helps engineers compare results from different tests.
| Measurement | Unit Used | Conversion |
|---|---|---|
| Liquid Test | Drops per minute | 1 mL = 16 drops |
| Gas Test | Bubbles per minute | Not applicable |
| Volume | mL or cc | 1 mL = 1 cc |
Inspectors use their eyes, count bubbles, or use special tools to measure leaks. These ways make sure every valve meets the leak rules before leaving the factory.
Note: Always check the leak limits for each test. Using the right units and ways keeps the system safe and working well.
Check Valve Leakage Rate
Test Procedures
API 598 sets clear steps for testing the seat tightness of a check valve. Inspectors first close the check valve and fill it with water or air, depending on the test type. For the liquid test, they use water to check for leaks at the seat. For the gas test, they use air and watch for bubbles. The inspector measures how much fluid or gas escapes past the closed seat during a set time.
The check valve test focuses on the seat area because this part stops backflow. Unlike other valves, a check valve only allows flow in one direction. The test checks if the seat can block flow in the reverse direction. Inspectors count drops for the liquid test and bubbles for the gas test. They use special tools to make sure the results are accurate.
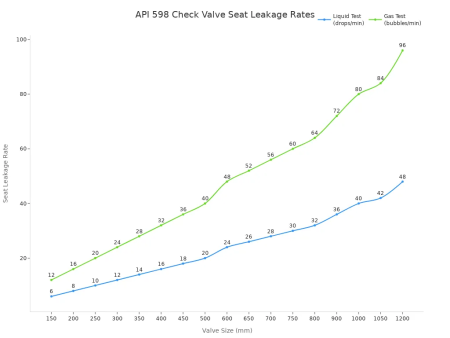
The table below shows the seat leakage rates for check valves of different sizes:
| Valve Size (mm) | Seat Leakage Rate (drops/min) Liquid Test | Seat Leakage Rate (bubbles/min) Gas Test |
|---|---|---|
| 150 | 6 | 12 |
| 200 | 8 | 16 |
| 250 | 10 | 20 |
| 300 | 12 | 24 |
| 350 | 14 | 28 |
| 400 | 16 | 32 |
| 450 | 18 | 36 |
| 500 | 20 | 40 |
| 600 | 24 | 48 |
| 650 | 26 | 52 |
| 700 | 28 | 56 |
| 750 | 30 | 60 |
| 800 | 32 | 64 |
| 900 | 36 | 72 |
| 1000 | 40 | 80 |
| 1050 | 42 | 84 |
| 1200 | 48 | 96 |
Note: For check valves larger than DN 1200, API 598 uses a formula to set the leakage rate. Inspectors must follow this formula for very large valves.
Inspectors also use a chart to compare leakage rates for different check valve sizes:
Acceptance Criteria
API 598 gives strict acceptance criteria for check valve seat leakage. The check valve passes the test if the leakage stays within the allowed rate for its size. For example, a 300 mm check valve must not leak more than 12 drops per minute in the liquid test or 24 bubbles per minute in the gas test. If the leakage is higher, the check valve fails and cannot be used.
A check valve with a nonmetallic seat may use different measurement methods if the manufacturer proves they work. However, the leakage rate must still meet the API 598 limits. Inspectors must see no visible leakage outside the allowed rate during the test time.
Check valves have different leakage rates compared to other valves. The seat area in a check valve faces unique flow conditions. API 598 sets higher leakage limits for larger check valves because bigger seats are harder to seal perfectly. This approach helps engineers choose the right check valve for each system.
Tip: Always check the seat leakage rate for each check valve size. Using the correct check valve keeps the system safe and prevents backflow.
API 598 Testing
Shell Test
The shell test checks the strength of the valve body and its pressure-containing parts. Inspectors fill the valve with water or another liquid. They then raise the pressure to a level higher than the valve’s normal working pressure. Most often, the test pressure is 1.5 times the cold working pressure (CWP) listed for the valve. The inspector looks for any visible leakage from the body, bonnet, or pressure boundary joints. No drops or wet spots should appear during this test. If the inspector sees any leakage, the valve fails the shell test.
This test does not check the seat or internal parts. It only checks if the valve body can hold pressure safely. The shell test is the first step in the api 598 sequence. It ensures the valve will not burst or leak from the outside when used in a system.
Note: The shell test uses a liquid because it is safer and easier to spot leaks. Gas is not used for this test because it can be dangerous at high pressure.
Back Seat Test
The back seat test applies to valves with a back seat feature, such as many gate and globe valves. The back seat is a special surface inside the valve that seals the stem when the valve is fully open. This test checks if the back seat can stop leakage past the stem packing area.
Inspectors open the valve fully and pressurize it with water. They then watch the stem area for any signs of leakage. No visible leakage should appear around the stem or packing. If the inspector sees any drops, the valve does not pass the back seat test.
The back seat test helps ensure that maintenance can be done safely. Workers can replace the stem packing while the valve is under pressure if the back seat holds tight.
Tip: Not all valves have a back seat. Only test this feature if the valve design includes it.
Seat Test
The seat test checks the tightness of the valve seat, which is the main sealing surface that stops flow when the valve is closed. This test is a key part of leakage class testing. Inspectors close the valve and apply either a liquid or a gas test, depending on the requirements.
For the liquid seat test, water is used. The inspector looks for drops leaking past the seat. For the gas test, air or nitrogen is used. The inspector counts bubbles escaping from the seat area. Each valve size has a set limit for allowable leakage. The valve passes if the leakage stays within these limits.
The seat test is important for both safety and system performance. It shows if the valve can stop flow as needed. The seat test is usually the last step in the api 598 testing sequence.
Callout: Always check the test medium and pressure before starting the seat test. The correct setup ensures accurate results.
Test Pressures
Test pressures play a key role in verifying the strength and tightness of industrial valves. API 598 sets clear guidelines for the pressures used during each test. These pressures help ensure that every valve can handle real-world conditions without failing or leaking.
Engineers use different test pressures for the shell, back seat, and seat tests. Each test checks a specific part of the valve. The shell test uses the highest pressure. This test checks if the valve body and pressure-containing parts can hold up under stress. The seat and back seat tests use lower pressures to check for leakage at the sealing surfaces.
Typical Test Pressures in API 598:
| Test Type | Test Medium | Pressure Applied | Purpose |
|---|---|---|---|
| Shell Test | Liquid | 1.5 × Cold Working Pressure (CWP) | Checks body strength |
| Back Seat Test | Liquid | 1.1 × CWP | Checks stem seal (if present) |
| Seat Test | Liquid/Gas | 1.1 × CWP or 80 psi (gas) | Checks seat tightness/leakage |
Note: Cold Working Pressure (CWP) means the maximum pressure a valve can handle at room temperature.
For the shell test, inspectors fill the valve with water and raise the pressure to 1.5 times the CWP. This high pressure helps find any weak spots in the valve body. No visible leakage should appear during this test. If the valve leaks, it fails and cannot be used.
The back seat test, used only for valves with a back seat, uses a lower pressure—1.1 times the CWP. This test checks if the back seat can stop leaks around the stem when the valve is fully open.
The seat test uses either liquid or gas. For liquid seat tests, the pressure is set at 1.1 times the CWP. For gas seat tests, the standard pressure is 80 psi or 5.5 bar, unless the valve is rated for lower pressure. Inspectors look for leaks at the seat area. The allowed leakage depends on the valve size and type.
Test Sequence:
- Shell test comes first to check the body.
- Back seat test follows, if the valve has this feature.
- Seat test is last, checking the main sealing surface.
Tip: Always use the correct test pressure for each step. Using the wrong pressure can give false results or damage the valve.
Test pressures in api 598 help engineers prove that valves are safe and reliable. These pressures match real system demands and help prevent failures in the field. By following these rules, companies keep their systems safe and avoid costly leaks.
Selection and Compliance
Performance
Engineers need to know how leakage classes affect how a system works. Each rating tells how much fluid can leak through a closed valve. When picking a valve, they check the leakage class to fit what the system needs. For example, Class VI valves are best for systems that must not leak. Class II valves are okay for jobs where small leaks do not matter.
A check valve is important because it stops flow from going backward. If a valve leaks too much, the system might lose pressure or let fluid go the wrong way. Engineers look at the leakage class to make sure the valve keeps the system safe and working well.
Tip: Always match the leakage class to the system’s safety and how well it must work before choosing a valve.
Application
Valves are used in many different industries. Chemical plants, power plants, and water treatment places all have special needs. Engineers pick a valve by looking at what it will be used for and what leakage class is needed. For example, a check valve in a water pipe may not need to stop leaks as tightly as one in a gas pipe.
The table below shows which leakage class fits each job:
| Application Area | Recommended Leakage Class |
|---|---|
| Utility Water | Class II |
| Steam Isolation | Class III or IV |
| Hazardous Gas | Class VI |
| Process Control | Class IV or V |
Picking the right valve and leakage class helps stop accidents and keeps everything working right.
Regulatory
Following industry rules is important for safety and following the law. API 598 gives the rules for testing leaks and passing valves. Before shipping, every valve must pass these tests. Inspectors check the leak rate and make sure it meets API 598 rules.
Other rules, like ASME B16.34 and ISO 5208, might also be needed. Companies must follow these rules to avoid trouble and keep things safe. If a valve does not pass the leak test, it cannot be sent out or used.
Note: Always check the newest rules and test results before saying a valve is okay to use.
Misconceptions
Zero Leakage
Many people do not understand what “zero leakage” means. Some think a valve can have no leaks at all, even with very sensitive tests. This is not possible for every valve, especially ones with moving parts. Here are some common mistakes people make:
- Some people think valves should never leak, even at very tiny levels like 1 x 10^-5 standard cc per second. This is not possible for moving seals like closure parts.
- Factory tests for leakage class use short times and less sensitive tools, usually about 1 x 10^-3 standard cc per second. This is good enough for most jobs but might miss very small leaks.
- Making the test longer can help find smaller leaks, but only a little. The extra help is small and does not always matter.
- People sometimes mix up static seals, like body joints, with moving seals. Zero leakage is possible for static seals, but not for moving parts.
- People also get confused between leaks inside the valve and leaks outside. Each kind of leak uses a different test.
- It is not possible for every valve to have zero leakage in tests. Makers must balance how sensitive the test is with keeping the valve safe from harm.
- Valve makers pick the best test for each valve type. They want to stop bad valves from leaving the factory, but also keep the valve safe during tests.
Note: Zero leakage is a goal for some jobs, but most valves will have a tiny leak at the seat.
API 598 vs. Other Standards
API 598 is not the only rule for valve leakage class tests. Other rules are FCI 70-2, ISO 5208, and MSS SP-61. Each rule has its own way to check and measure leaks. The main differences are:
- FCI 70-2: This rule is for control valves and uses different classes. It often uses Class IV, V, and VI. Class VI is the tightest shut-off for soft-seated valves.
- ISO 5208: This world rule covers many valves and has its own class system. The leak limits and test ways may not match API 598.
- MSS SP-61: This rule is used for metal-seated valves. It has its own leak limits and test steps.
A valve that passes one rule may not pass another. Engineers must check which rule fits their job. The rule picked changes the class, the test, and the allowed leak.
Maintenance
Valves can change as they get older. Wear, dirt, or damage can make a valve leak more. The leakage class a new valve meets may not stay the same after years of use. Doing regular care helps valves work as they should.
- Cleaning and changing old parts can help a valve meet its class again.
- If a valve leaks too much, it may need fixing or replacing.
- Maintenance teams should check valves often, especially where tight shut-off is needed.
Tip: Always test valves again after fixing them to make sure they still meet the right leakage class.
Knowing about valve leakage classes and API 598 testing helps engineers pick the right valve for each job. Measuring leaks the right way keeps people and equipment safe. It also helps the system work well. Engineers should always check API 598 and other rules before choosing a valve.
Watching leakage limits closely helps the system work right and follow the rules.
FAQ
What does API 598 cover?
API 598 tells how to check and test industrial valves. It gives rules for checking if valves are strong and do not leak before shipping. This standard is for gate, globe, and check valves with different seat materials.
How do engineers select the right leakage class?
Engineers look at what the system needs and how safe it must be. They pick the leakage class based on the job, the fluid, and how tight the valve must close. The leakage class chart in API 598 helps them choose.
Can a valve achieve true zero leakage?
No valve with moving parts can have zero leakage. Even Class VI valves let out a tiny bit. Only static seals, like body joints, can have zero leakage during tests.
What is the difference between liquid and gas seat tests?
Liquid seat tests use water to look for drops. Gas seat tests use air or nitrogen and count bubbles. Gas tests find smaller leaks because gas escapes easier than liquid.
Are soft-seated valves always Class VI?
Most soft-seated valves meet Class VI rules. These valves use Teflon or elastomers to stop leaks. Still, engineers should check the leakage class with the maker.
How often should valves be retested for leakage?
Valves need retesting after fixing, repair, or if leaks get worse. Checking valves often helps make sure they still meet the right leakage class.
Does API 598 apply to all valve types?
API 598 is mostly for gate, globe, and check valves. Other valves, like ball or butterfly valves, may need other rules or extra steps.